Introducing Plum: A Complete E2E Test Automation Platform
Install, write tests, and manage your test repository with Plum — Playwright + Cucumber with a full web UI, distributed runners, scheduling, and MCP support.

Plum is an open-source, end-to-end test automation platform I built because I was tired of stitching together a test runner, a report viewer, a test case manager, and a scheduler from four different tools. Plum bundles all of that into a single package you can install in seconds.
At its core, Plum is a Playwright + Cucumber environment with a full web UI bolted on. You write feature files in Gherkin, implement step definitions against Playwright, and Plum handles the rest: running tests locally or across distributed nodes, tracking manual and automated results in a shared test repository, scheduling recurring runs, streaming live output to the browser, and even exposing an MCP server so Claude can write your tests manual tests and run automated tests autonomously.
The key idea that makes everything click is automatic tag matching. When you tag a Cucumber scenario with @TC-001, Plum connects that scenario to the test case with display ID TC-001 in your test repository. After every run, the case is flagged as automated and a pass/fail history record is created — no manual bookkeeping required.
Installation
Plum ships as a global npm package. Node.js 18+ is all you need to get started.
npm install -g plum-e2eOnce installed, scaffold a new project in any empty directory:
mkdir my-tests
cd my-tests
plum init
plum init sets up the full project skeleton:
tests/features/— your Gherkin feature filestests/step_definitions/— TypeScript step implementationstests/pages/— Playwright page objects.env— environment config (BASE_URL, IS_HEADLESS)plum.plugins.json— extra npm dependencies your steps needtsconfig.json— IDE type resolution for Playwright and Cucumber
At this point you can already run tests locally without Docker — no database, no UI, just plain test execution:
plum run-test            # run everything
plum run-test @smoke     # filter by tag
plum run-test --parallel 4 --browser firefox
To unlock the full web UI (reports, test repository, scheduling, user management), start the server stack. This requires Docker:
plum server startPlum walks you through an interactive setup the first time — project name, ports, logo URL — and then starts the full Docker Compose stack. The frontend dev server runs outside Docker for fast hot reload. The backend and PostgreSQL run in containers. Prisma migrations are applied automatically on startup.
To restart or stop the stack later:
plum server restart   # rebuild and restart (no prompts)
plum server stop      # stop containers, data preserved
Writing Tests Manually in the Test Repository
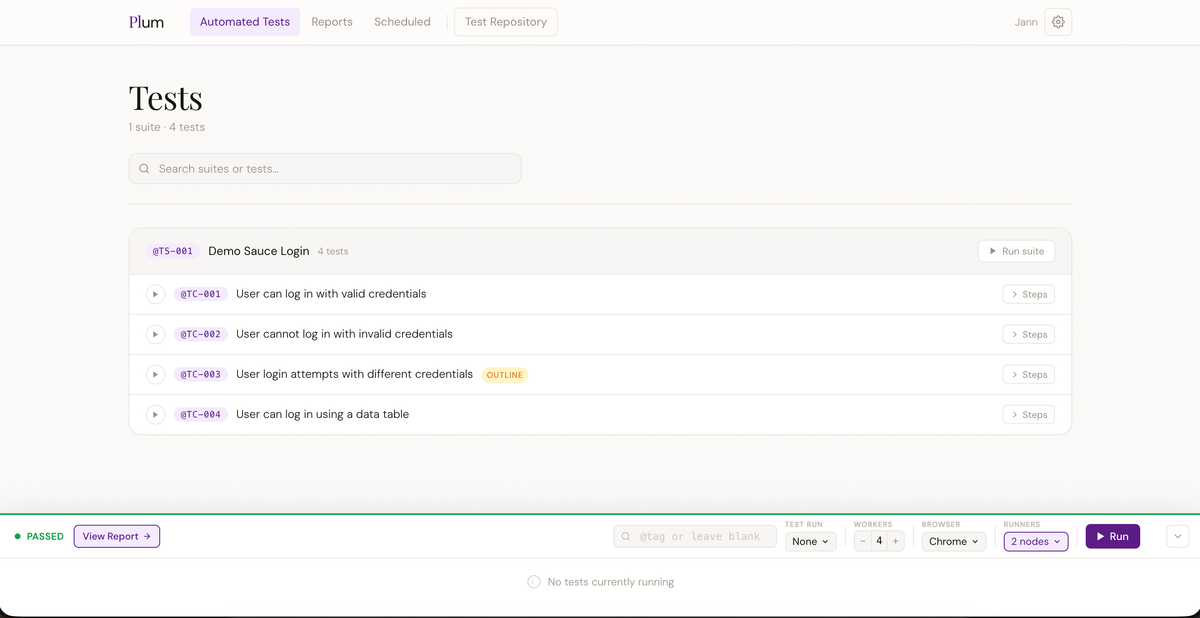
Even before you write a single line of code, Plum lets your QA team document what needs to be tested. Open the Test Repository in the sidebar. You will see two tabs: Suites and Runs.
Test Suites
A test suite is a named group of test cases — think of it as a folder. Create one by clicking New Suite, giving it a name, an optional description, and a priority (low / medium / high / critical). Plum auto-assigns a display ID like TS-001.
Test Cases
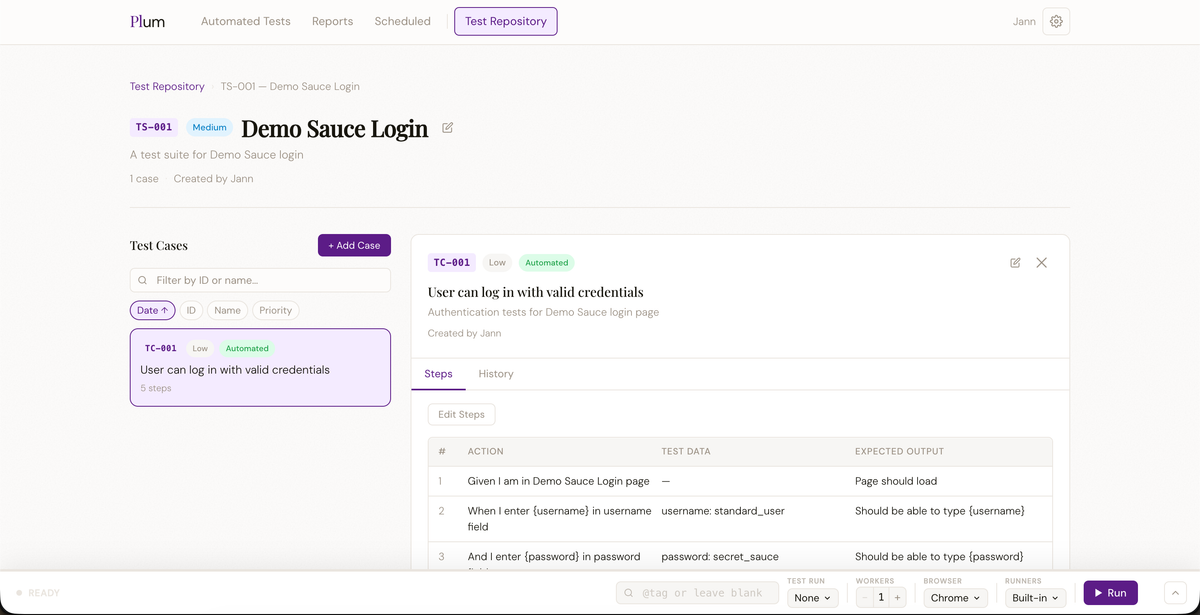
Open a suite and click New Test Case. Fill in a title, description, and priority. Plum assigns the case a display ID — TC-001, TC-002, and so on — derived from a global sequence stored in your project settings. This ID is what connects a manual test case to an automated Cucumber scenario later.
Each test case can have an ordered list of manual steps. Each step has three fields: Action, Test Data, and Expected Output. These steps are what a QA engineer follows when executing the test by hand.
Test Runs
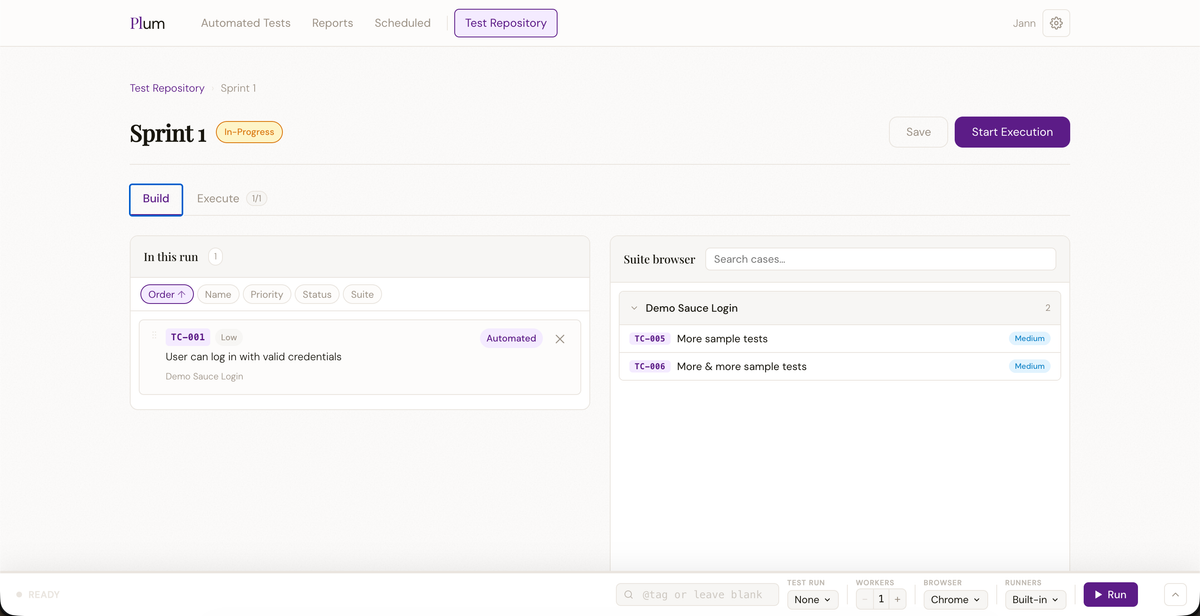
A test run is a manual execution campaign. Switch to the Runs tab and click New Run. Give it a title, then select which test cases to include. Each case becomes a run entry. You can assign entries to specific team members. As testers work through the cases they mark each entry as Pass, Fail, Blocked, or Skip and add notes.
Every status update writes a history record against the test case so you always have a full execution timeline — both manual and automated runs — in one place.
Writing Automated Tests
You will still be writing tests in your preferred IDE. This gives you the full freedom to do anything as long as you have Cucumber feature files. While the scaffold is the method I personally prefer (BDD + POM), you are definitely free to use any architectural style you want as long as it uses Cucumber!
Automated tests live in the tests/ directory that plum init created. Plum uses Cucumber for the test description layer and Playwright for browser automation.
Feature files
Create a feature file in tests/features/:
# tests/features/auth.feature

Feature: Authentication

  @TC-001
  Scenario: User can log in with valid credentials
    Given I am on the login page
    When I enter email "[email protected]" and password "secret"
    Then I should be redirected to the dashboard

  @TC-002
  Scenario: User cannot log in with wrong password
    Given I am on the login page
    When I enter email "[email protected]" and password "wrong"
    Then I should see an error message
The @TC-001 and @TC-002 tags are not decoration — they are the IDs that link these scenarios to the test cases you created in the repository.
Step definitions
Implement steps in tests/step_definitions/. You can scaffold a new step file interactively:
plum create-stepOr write one manually:
// tests/step_definitions/auth.steps.ts
import { Given, When, Then } from "@cucumber/cucumber";
import { LoginPage } from "../pages/LoginPage";

Given("I am on the login page", async function () {
  this.loginPage = new LoginPage(this.page);
  await this.loginPage.navigate();
});

When("I enter email {string} and password {string}", async function (email, password) {
  await this.loginPage.fillCredentials(email, password);
  await this.loginPage.submit();
});

Then("I should be redirected to the dashboard", async function () {
  await this.page.waitForURL("**/dashboard");
});
Page objects
// tests/pages/LoginPage.ts
import { Page } from "@playwright/test";

export class LoginPage {
  constructor(private page: Page) {}

  async navigate() {
    await this.page.goto(process.env.BASE_URL + "/login");
  }

  async fillCredentials(email: string, password: string) {
    await this.page.fill('[name="email"]', email);
    await this.page.fill('[name="password"]', password);
  }

  async submit() {
    await this.page.click('[type="submit"]');
  }
}
You can also scaffold an entire feature — feature file, page object, and step definitions — in one go:
plum create-testThis opens an interactive prompt that generates the full boilerplate for you.
How Locally Written Tests Flow Into the UI
When you run tests against a Plum server instance, the execution pipeline works like this:
Trigger from UI or CLI. You can kick off a run from the dashboard (pick a tag filter, worker count, and browser then hit Run), from a scheduled cron job, or directly from the terminal with
plum run-test.Plum syncs your test files. The backend receives the run request, syncs the
tests/directory into its working area, and installs any dependencies listed inplum.plugins.json.Cucumber runs with Playwright. The test runner spawns a Playwright + Cucumber process with the tag filter and worker count you specified. Output is streamed live to the browser via Socket.io — you can watch each scenario pass or fail in real time on the Live page.
Results are processed. When the run finishes, the raw Cucumber JSON output is parsed. Screenshots captured on failure are extracted to disk. A Report record is written to PostgreSQL with the full JSONB content.
You are redirected. After a three-second countdown on the Live page you land on the full report — features, scenarios, steps, error messages, and screenshots all laid out for you.
The Live page also supports multi-lane views when running across distributed nodes. Each runner gets its own output lane so you can watch all of them simultaneously.
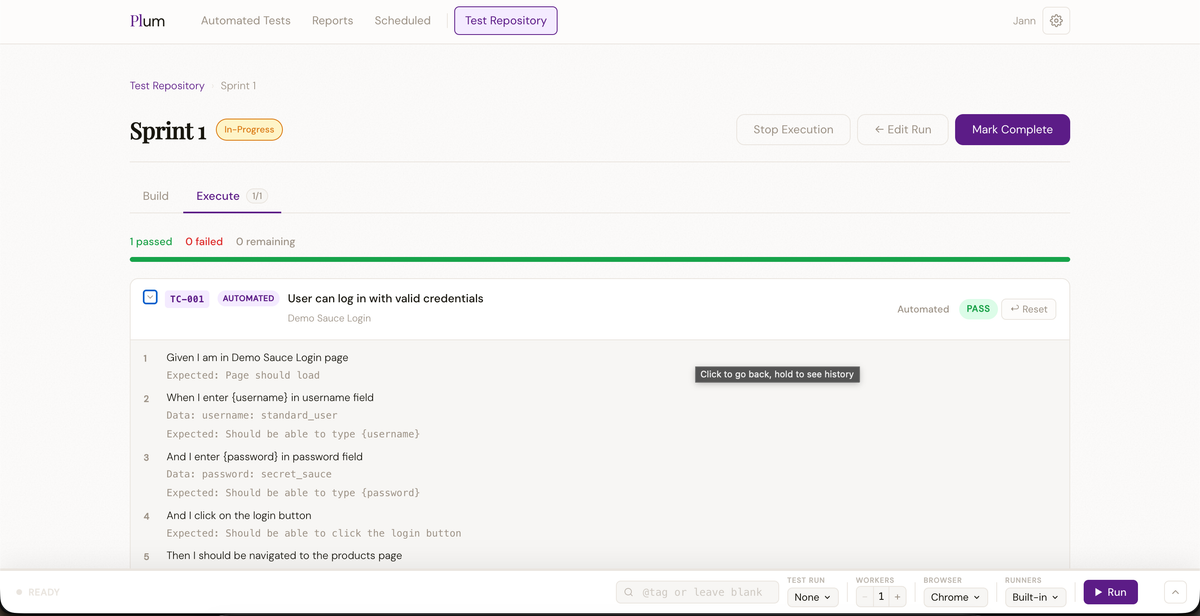
How the Test Repository Recognizes Automated Tests
This is the part I am most proud of. There is no import step, no YAML mapping file, and no manual flag to flip. The link between a test case and its automation is established automatically the moment a test report is processed.
Here is exactly what happens:
Cucumber emits a JSON report. Every executed scenario includes its tags. For a scenario tagged
@TC-001, the JSON will contain{ "name": "@TC-001" }in the tags array.The backend strips the
@prefix from every tag and searches the test cases table for a matchingdisplayId.On a match, two things happen immediately:
The test case is updated to
isAutomated: true. The Automated badge appears on the case in the repository — you never have to set it yourself.A
TestCaseHistoryrecord is created: result (pass or fail), execution timestamp, a link to the report, and — if the run was triggered as part of a manual test run — a link to that run entry as well.
If a manual test run was in progress and the tag matched one of its entries, that entry's status is updated automatically to reflect the automated result. You get the best of both worlds: a human-readable test run that stays current without manual updates.
The practical outcome: open any test case in the repository and you will see its full execution history — every time it ran, whether manually or automatically, what the result was, and which report or test run recorded it.
Settings
The Settings page is split into eight tabs. Here is what lives where.
Project
Set your project name and logo URL. This information appears in the header and in notification messages. You can also configure S3 automated backups of your test repository here — set an S3 endpoint, region, bucket, access key, secret, and a cron expression for how often to back up.
Runners
Register external runner nodes. Each runner has a name, a reachable URL, an authentication token, and a preferred browser. Plum probes the runner before saving it to verify connectivity. You can ping any runner at any time to check its health. Deleting a runner sends a graceful shutdown signal to the node process.
Repository
Configure the prefix used for auto-generated display IDs. The defaults are TC for test cases and TS for test suites, producing IDs like TC-001 and TS-001. If you want to change the prefix — say to TEST and SUITE — set the new values here and click Migrate. Plum renumbers every existing case and suite in bulk without breaking anything.
Integrations
Paste in a Discord webhook URL, a Slack webhook URL, or a custom public endpoint. Plum will POST a formatted pass/fail summary to these destinations after every cron-scheduled run (or manual run, if notifications are enabled). There is a Test button for each channel so you can verify the connection before committing.
MCP
Generate or rotate the API key that the Plum MCP server uses to authenticate with the backend. Plum shows you a ready-to-paste shell snippet for setting the environment variable. More on MCP below.
Account
Update your display name, email, and password. Changing the password requires you to confirm the current one.
Users (admin only)
Create team members, assign roles, and delete accounts. Covered in detail in the next section.
Backup
Manually export the entire test repository (suites, cases, steps, runs, history) as a JSON file, or import one. This is separate from S3 backups — a quick local snapshot you can email or commit to version control.
User Creation, Types, and Roles
On first start, Plum detects that no users exist and redirects you to the Setup page where you create the initial admin account. Enter your name, email, and a password (minimum eight characters). That is the only account with full privileges until you create more.
Roles
Plum has two roles: Admin and User.
Capabilities
Run tests — Admin: Yes | User: Yes
View reports — Admin: Yes | User: Yes
Create test suites and cases — Admin: Yes | User: Yes
Create and execute test runs — Admin: Yes | User: Yes
Update own profile and password — Admin: Yes | User: Yes
Manage project settings — Admin: Yes | User: No
Create and delete users — Admin: Yes | User: No
Generate MCP keys — Admin: Yes | User: No
Manage runners and cron jobs — Admin: Yes | User: No
Creating users
Go to Settings → Users. Click New User, fill in name, email, password, and select a role. The new user can log in immediately. You cannot delete your own account.
Every test case, suite, test run, and run entry tracks who created it and, for entries, who it is assigned to and who executed it. This gives team leads full visibility into who is doing what across both manual and automated testing.
Distributed Execution with Runner Nodes
When a single machine is not fast enough, Plum scales horizontally. Runner nodes are lightweight processes you start on any machine in your network:
plum node start --primary http://plum-server.example.com:3001The node registers itself with the primary server, receives a unique token, and starts listening for execution requests. It does not need a database or Docker — it is just a Node.js process.
From the UI, pick multiple runners when triggering a test run. Plum splits the tag set across the nodes, each runner executes its chunk in parallel, and the results are merged into a single report. The Live page shows a separate output lane per runner so you can watch them all simultaneously.
plum manage-runners     # interactive menu
plum node restart       # stop, pull latest deps, restart
plum node stop          # stop the node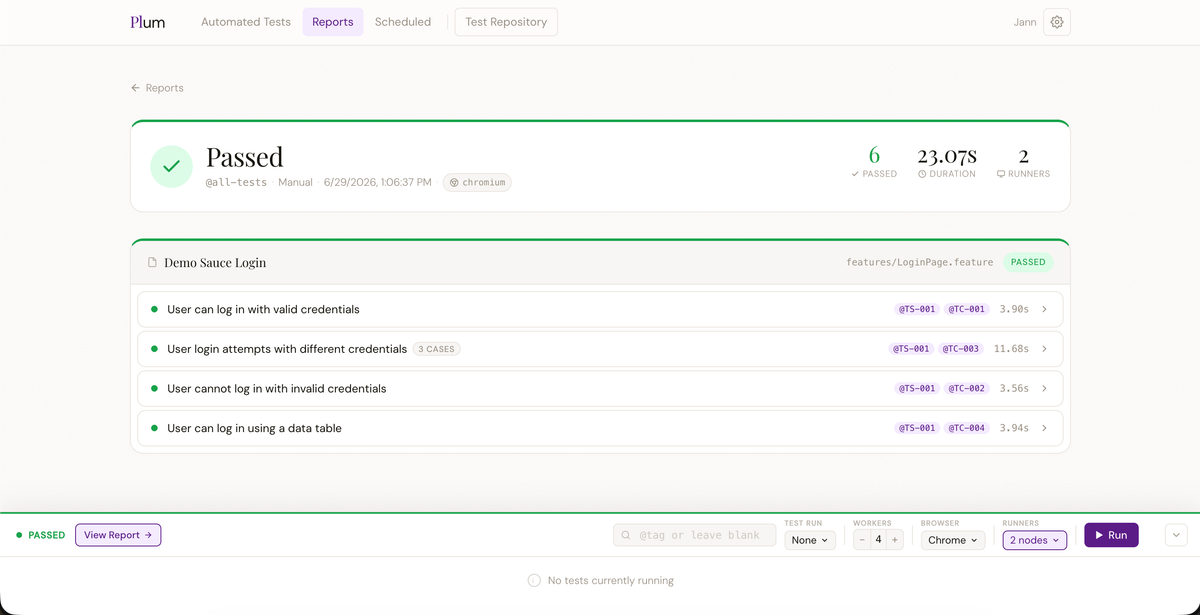
Scheduled Runs
Go to Scheduled Tests in the sidebar and click New Job. Set a task name, a cron expression (e.g. 0 9 * * MON-FRI for weekdays at 9am), a tag filter, worker count, browser, and which runner to use. You can also attach Discord or Slack webhook URLs per job so the team gets a notification on every failure.
Jobs run entirely server-side via node-cron. Enable or disable them at any time without touching the server. Each job keeps a history of all the reports it has generated so you can see pass rate trends over time.
MCP: Let AI Write Your Manual Tests and Run Your Automated Tests!
Plum's MCP server is a stdio process that bridges any MCP-compatible AI client with your running Plum backend. The backend (started via plum server start) is what actually stores data and runs tests — the MCP server is just the translation layer between your AI and that API.
You register it once in your AI client's MCP configuration. After that, the client spawns it automatically — you never need to start it manually.
Generate your API key in Settings → MCP, then ask the AI to register the MCP. It should ask for the URL and the token you generated. The URL should be your backend for example http://localhost:3001 (Plum's default backend port) or if you are hosting it, give it your API URL. Of course you can manually add it to your MCP config using:
{
  "mcpServers": {
    "plum": {
      "command": "plum"
      "args": ["mcp"],
      "env": {
        "PLUM_API_URL": "http://localhost:3001",
        "PLUM_API_KEY": "your-key-from-settings"
      }
    }
  }
}
Claude can then interact with Plum through a set of structured tools:
list_test_suites — browse the repository
get_test_suite — inspect a suite and all its cases
create_test_suite — add a new suite from a description
create_test_case — add a case with title and steps
set_test_steps — write or rewrite the manual steps for a case
run_tests — trigger a test run with a tag filter and wait for results
get_run_status — poll a running job by ID
list_reports — see recent execution history
get_report_summary — get a natural-language summary of failures
In practice this means you can ask Claude to explore what tests exist, identify gaps, generate new feature files, execute a targeted run, and then tell you exactly which scenarios failed and why — all without leaving your editor. The MCP server polls job status every five seconds and returns a structured result within a ten-minute timeout, so it handles long-running suites naturally.
Getting Started Today
Install, initialise, and run your first test in under two minutes:
npm install -g plum-e2e
mkdir my-project && cd my-project
plum init
plum run-test
When you are ready for the full stack:
plum server startPlum is open source under the GPL-3.0 license. The source is on GitHub at github.com/silverlunah/plum. Issues, pull requests, and feedback are welcome.
What's next
Currently, reports just display pass/skipped/fail and a screenshot of the last page on failure. I am planning to add more features like streaming the browser in the UI, replays, etc. soon, but I still need to do some research on what the best practices would be. Really excited for what's coming next!

